Living Room Progress and the Gift of Home tour

Hello Friends!!
Today kicks off Day 2 of the Gift of Home tour series, and I am so excited for you to see what my friends and I are sharing today. If you missed Day 1, you can see it HERE, and remember each blogger who is sharing in this blog hop is also giving away a copy of my NEW book!! You can enter for a chance to win on each blog, so be sure to stop by and visit! I debated on whether I should share something I loved most about our previous home, or if I should share something I love most about our new home. Of course there is much to love about our new home, but I will be honest, none of the rooms feel quite finished yet. But I am a big believer in progress. Small tiny changes that make an impact over time, and new living room is getting so close! So today I’m sharing our living room progress, and the steps I’ve taken along the way.
Come and see~
If you are new here, welcome! I’m so glad you are here. Just a slight recap – my family and I moved last just about 9 months ago from our beloved home of 10 years. The home that I wrote The Gift of Home in. Although we didn’t go far. We moved right across town, to a home that my husband and I had loved since high school. You can read more about our move HEREand while we are completely head over heels with our new home, there are still some things design wise that we plan on doing to make it more like us.

When we first moved in I felt a bit stumped with our living room. Similar to how I felt with our dining room in our previous house, but I knew if I just started eventually this would turn into a room that I loved. We started first by sanding down the pine floors. They felt a bit too yellowish/orange, and I knew they would always drive me nuts because they were the foundation in the room.
Before

After Sanding~

Our new living room is more of a rectangle compared to our last one, and with the addition of my moms piano, a more natural furniture layout would include a sectional in the far corner. There is nothing wrong with our current living room sofa, so we decided to wait and save up towards getting a sectional down the road. Instead of waiting until I have the furniture that I want for the space, I’m focusing on little changes I can make now that will still reflect our personal style in our living room.
I painted the walls white, because I knew I loved having white walls.

Once the floors were done and the walls were painted, I sat with it like this for awhile. While I waited for our new curtains from Wovn Home to arrive, I spent time in our living room, looking at each blank wall, and really thinking through what I envisioned for the space.
We made a console table out of old barn wood to help fill a bare wall that wasn’t quite big enough for more seating, but was too big of a space to leave bare. (see more of that project HERE)
Before

after

Then the curtains arrived, and once they were hung it felt like our living room received one giant hug.

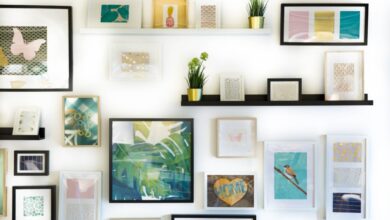
I focused on bringing in colors and accents that reflected my design style. Texture and layers to help the room feel more warm and inviting. One of the things I’ve learned about decorating rooms with white walls, is you have to make sure you have enough warmth and texture to keep the space from feeling cold and bare. I want our living room to feel like a warm embrace when you enter it. Almost like the room is hugging you back – so to speak, so I focused on adding artwork and accessories that helped me achieve that feeling I was after.
Here is our living room today.


I focused on adding layers into our living room with the area rugs, throw pillows, and even the way the accessories are layered on the coffee table and side tables. And of course with the curtains! I can’t say enough about how much curtains can really impact your space. I shared in my post, How to Hang Curtains, but often times I find when people ask me questions about what their space is lacking, they just need to hang their curtains high and wide. When we hug the window frame too closely it can make our room feel smaller. But if you hang your curtains a little higher and a little wider than the window frame, it can make your room feel dramatically bigger.


I focused on bringing in elements that were in my favorite colors. I would put these faux white hydrangea stems in every room of my house. Of course my husband would think we lived in a florist shop, but that’s how I know they are my favorite if I want to use them in every single area of my home. I love fresh flowers, and I love white, and these white faux stems encompass two of the things I truly love.

Over Thanksgiving break we also made a new coffee table. Our previous living room didn’t have the space for a larger coffee table, and as much as I loved our family heirloom trunk, we needed something slightly bigger. Made from the same wood we used for our DIY console table, I drew up how I wanted the coffee table to look, and the hubby got busy building it. That is usually how all of our projects turn out.


Other than white, my favorite color is blue. So I brought in pops of blue that play off of each other in the area rug, throw pillows and accessories.

This also helped me decide on artwork for our living room. Since the windows are off centered, it left one corner of our living room with a lot of wall space. I stared at these blank walls for quite a few months contemplating what I wanted to do with them. I took my time, so that I could really contemplate exactly what I would want to hang on them.
Incorporating artwork in your favorite color is another great way to reflect your style throughout your home.


A mix of landscape paintings in different shades of blue and greens where just the subtle pop of color these walls needed. All of the artwork in this grouping is from Print Collectionsand I will be sharing the tutorial for how I hand picked and hung each one.

Creating a space you love shouldn’t feel tricky. I think what makes it difficult is when we rush the process, thinking it can be accomplished in the same amount of time as our favorite 30-minute home improvement show. Allowing yourself the time to really think through each part of your space. The colors and patterns and even wood finish you are drawn to, are all necessary steps that are part of the process to creating a space that you love.
When I feel stuck with a space I begin to ask myself these questions. How do I want the space to feel? What are some of my favorite colors, and are they currently present in this space? Is there an area where I can add layers or texture to help the space feel more alive? Once I begin to take inventory of my current spaces needs, and remove the pressure of having to fit into a design category, I can freely explore my options and choosing pieces I love, without worrying if I mess up.
Here is a quick look at how our living room has progressed over the past 9 months ~


Next up on the tour is Beth from Home Stories AZ, and I just know you will love Beth’s home. She’s sharing all about Making Your Home Your Own. I love how she shares some practical tips, especially when the budget doesn’t allow for a full gut remodel. Something I think we can all relate too! You can enter the giveaway on Beth’s blog as well, and be sure to stop by the others who are also sharing today. A full list is below ~
Win a Copy of my NEW Book!!
Be sure to stop by each blog who is sharing ~
Friday 1/21
Wednesday 1/19